A gas oven hits temperature fast, holds it steady, and forgives almost everything except a bad launch. That is the whole job: get a dressed dough off the peel and onto a hot stone in one motion, then turn it twice before the rim goes from leoparding to ash. Pizza peel technique is not a talent you are born with. It is four moves you can rehearse with a bag of flour and a cold oven before you ever open the propane valve.
I have watched a lot of first pies die on the peel. Mine included. The fix is never a better recipe, and it is almost never a better oven. It is the order of operations between shaping the dough and pulling the pie, and that order is the same whether you are cooking on a $200 gas box or a dome that costs as much as a used car.
Here is the sequence, the two pieces of gear that make it possible, and the five failures that account for nearly every ruined pie in a backyard oven.
Why you should trust me
I spent five years on the oven line at a Neapolitan pizzeria in northern New Jersey before I switched to writing about food, and I still live two blocks from a pizzeria that has been running since 1948. Since then I have cooked through eight pizza ovens over three years, from a countertop electric box to a wood-fired dome.
Every oven gets the same two dough recipes so the results compare, a stone temperature reading from an infrared thermometer before the first launch, and a minimum of eight pies before I form an opinion. I keep a crust scorecard for each session: char, leoparding, rim rise, bottom crisp. The photos are on my phone and they are not flattering to every oven I have tested.
How I picked and how I tested
The gear in this article is not about which oven wins a shootout. It is about the two things that stand between you and a launched pie: a heat source that actually reaches Neapolitan temperatures, and a tool that gets the dough off the counter and into the mouth of the oven without folding it in half.
Temperature range is the spec that matters most to me. A 12-inch oven that hits 900F beats a 16-inch oven that struggles past 700F every single time, because the entire character of the crust depends on a fast bake. A slow bake dries the rim before it leopards, and you end up with something closer to a cracker than a pizza.
For the peel, I care about three things: blade size relative to the oven mouth, whether the dough slides when you shake it, and whether the thing fits in a kitchen drawer or a closet when the night is over. I have no patience for a peel that lives on the counter because it cannot be stored.
Both pieces below are the ones I would hand a first-timer, and the workflow section covers what to do with them, in order, step by step.
What you need before the first pie
Two items. Everything else, you already own: a bowl, a scale, a bench scraper, a can of tomatoes, and a ball of dough you have made at least a few times.
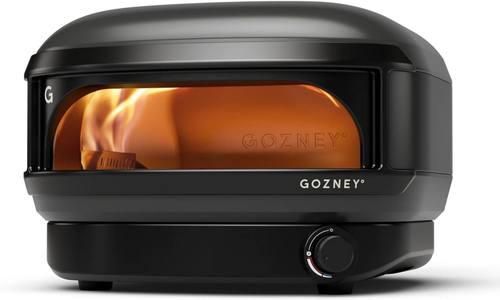
The oven: Gozney Arc Lite Propane Outdoor Pizza Oven, Heats up to 950F - Off Black
 Visit on Amazon →
Gozney builds ovens the way restaurant equipment gets built, and the Arc Lite is the propane model in that family, rated by the manufacturer to heat up to 950F in off black. Propane means no fire tending, no split wood, no waiting on coals. You open the valve, push a button, and the deck is ready in the time it takes to shape two dough balls. For a weeknight, that is the entire argument. Gas for Tuesday, wood for Saturday, and anyone who tells you one is objectively better has not cooked on both.
What I look for in this class of oven is headroom. You want an oven that can run hotter than your target, because the deck is always cooler than the dome and the stone cools the moment a cold dough lands on it. An oven that tops out just above your target has nowhere to go when the first pie drags the temperature down.
Flaws but not dealbreakers: Propane is a supply chain you have to manage. A tank that runs dry at 6pm on a Friday is a real problem, and cold weather drops tank pressure, so keep a spare and keep the tank out of the wind. You also give up the wood smoke that a fuel-fed oven gives you, which is a flavor decision you make once and then stop thinking about.
Weeknight cooks who want a hot deck without tending a fire should start here. Check current Amazon price.
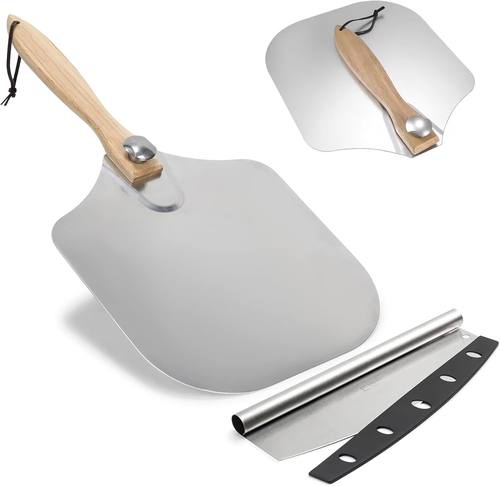
The peel: SKH Premium Aluminum Pizza Peel with Foldable Wooden Handle & Rocker Cutter -Large 23" x 12" Metal Pizza Paddle for Perfect Pizza, Easy Storage, and Precise Slicing
 Visit on Amazon →
The blade is the part that matters, and a 23 by 12 inch aluminum paddle is sized for a full-size home pie with room to spare on both sides. A metal blade slides under a set crust more easily than wood and it does not hold moisture, which matters if you are cooking four pies in a row and the peel gets dusty between launches.
The foldable wooden handle is the feature I did not know I wanted until I lived with it. A 23-inch blade with a fixed handle does not fit in a normal drawer and it does not hang neatly in a small kitchen, so it ends up leaning in a corner collecting dust. Fold it down and it stores like a cutting board. The included rocker cutter handles the last step, which is slicing a pie with a rim that is taller and crispier than any wheel cutter is designed for. A rocker goes straight through it in one pass instead of sawing.
Flaws but not dealbreakers: Metal blades demand flour discipline. Too little and the dough grabs, too much and you get a bitter dusting of raw flour on the bottom of the crust. You will calibrate this after two or three pies. Also keep the wooden handle out of the rain and out of the sink; wood and standing water are not friends.
Anyone launching full-size pies in a small kitchen, where storage is the thing that decides whether a tool gets used, will get the most out of this one. Check current Amazon price.
The actual workflow, step by step
This works in any gas oven that can hold a hot deck. The steps are in order and the order is the point.
Step one: Preheat the stone, not the air. Light the oven and let it run at full flame for a solid 20 to 30 minutes. Then read the deck with an infrared thermometer, not the dome, not the air, and not the dial. You are looking for roughly 750 to 850F on the stone surface for a bake in the 60 to 90 second range. Aim your reading at the center of the stone, where the pie will actually sit. If you do not own an infrared thermometer, buy one before you buy anything else. Guessing is how you get a burnt bottom and a raw middle.
Step two: Flour the peel correctly. A thin, even layer of semolina, or a 50/50 blend of semolina and all-purpose flour, across the whole blade. Semolina behaves like tiny ball bearings and it does not burn the way raw flour does. Spread it with your hand, then tilt the peel and give it a shake over the sink so the excess falls off. What remains should be a dusting, not a drift.
Step three: Build the pie on the peel, and build it fast. Sauce first, then cheese, then a light hand with toppings. Every second the dressed dough sits on the peel is a second the moisture starts working its way through the flour layer. Keep it under a minute. Shake the peel every 15 seconds while you build. If the dough slides, you are fine. If it does not, lift one edge with your fingers and toss a pinch of semolina underneath. Do not wait until you are standing at the oven mouth to discover the problem.
Step four: Launch with one motion. Open the oven, bring the peel in at a shallow angle, and put the front edge of the dough about an inch from the back of the stone. Then one quick forward jab and a short pull back. The dough stays, the peel comes out. Do not push it off with your hand and do not hesitate halfway through. A slow launch drags the toppings forward and folds the pie.
Step five: Turn it every 20 to 25 seconds. The back of the oven is hotter than the front, so a pie left alone will burn on one side and pale on the other. Slide the peel under the pie, rotate it a quarter turn, and pull the peel back out. Three turns gets you a full rotation and an even rim. This is where a full-size blade earns its keep, because you can turn the whole pie without a second tool.
Step six: Pull on the visual cues, not the clock. You are done when the rim has leoparding, those dark blistered spots across the cornicione, and the underside has char spots you can see when you lift an edge. Char is flavor. Burnt is black and bitter. The line between them is about 15 seconds, which is why you stand at the oven instead of walking back inside.
Step seven: Rest for a minute, then slice. Give the pie 60 seconds on a rack so the bottom stays crisp instead of steaming on a solid surface. Then run the rocker cutter straight across it. A rocker is the right tool for a Neapolitan-style rim because it cuts down through the whole pie in one motion instead of dragging the cheese sideways.
Step eight: Fire the second pie immediately. Your oven is at its best right now, fully saturated and settled. The first pie is practice. The second one tells you what you bought.
What goes wrong, and how to fix it
The dough sticks to the peel. Too much topping weight, too much sauce, or too long on the peel. Fix: less sauce, fewer toppings, faster build, more semolina. A heavy pie is a pie that is not going anywhere.
Burnt bottom, raw top. The stone is hotter than the dome air, which happens when you launch at full flame after a long preheat. Fix: turn the burner down right after the launch, then bring it back up between pies. The stone carries enough heat to finish a 70-second bake on its own.
Pale, tough crust. The stone was not hot enough, usually because the preheat was short or the oven was opened too often. Fix: longer preheat, one hand on the door, and read the stone before every launch, not just the first.
Wind steals your heat. A gas oven with a wide mouth loses its dome temperature fast in a breeze. Fix: position the oven so the mouth faces away from the prevailing wind, or set up a screen. This is the most common reason a gas oven underperforms its own spec sheet.
Cold-weather propane problems. Tank pressure drops in the cold and the flame gets lazy. Fix: keep the tank out of the wind, and swap to a fresh tank before a cookout instead of during one.
The first pie is always bad. Plan for it. Make an extra dough ball and accept that pie number one is the calibration run. Everyone who cooks pizza outdoors goes through this, including the people who write about it.
What this actually costs
Two line items: the oven and the peel. The oven is the real spend, and it is the one purchase where the spec that matters is temperature headroom, not cooking surface. The peel is the cheapest piece of gear in this entire hobby and it is the one that decides whether your oven gets used on a Tuesday or sits under a cover until July. Check current Amazon price on both before you commit, because prices on this gear move around with the season.
Everything else you already have. The dough costs pennies a ball, the sauce is a can of tomatoes and a pinch of salt, and the cheese is whatever your grocery store does well. The cost per pie drops every time you cook, which is the argument for buying an oven you will actually light on a weeknight rather than one you save for company.
That is the whole job. Heat the stone, flour the blade, launch once, turn three times, pull on the blisters. Your oven was built to do this. Let it.